

Key Takeaways
Why Damp Is a Structural Threat, Not Just a Cosmetic Problem
Moisture that works its way into a home's fabric doesn't just look unpleasant — it quietly degrades timber framing, corrodes metal fasteners, compresses insulation, and creates conditions where mould colonies can establish within 24 to 48 hours of a surface staying wet. By the time damp becomes visible as staining, bubbling paint, or a musty smell, it has often been present inside the wall or ceiling assembly for weeks or months.
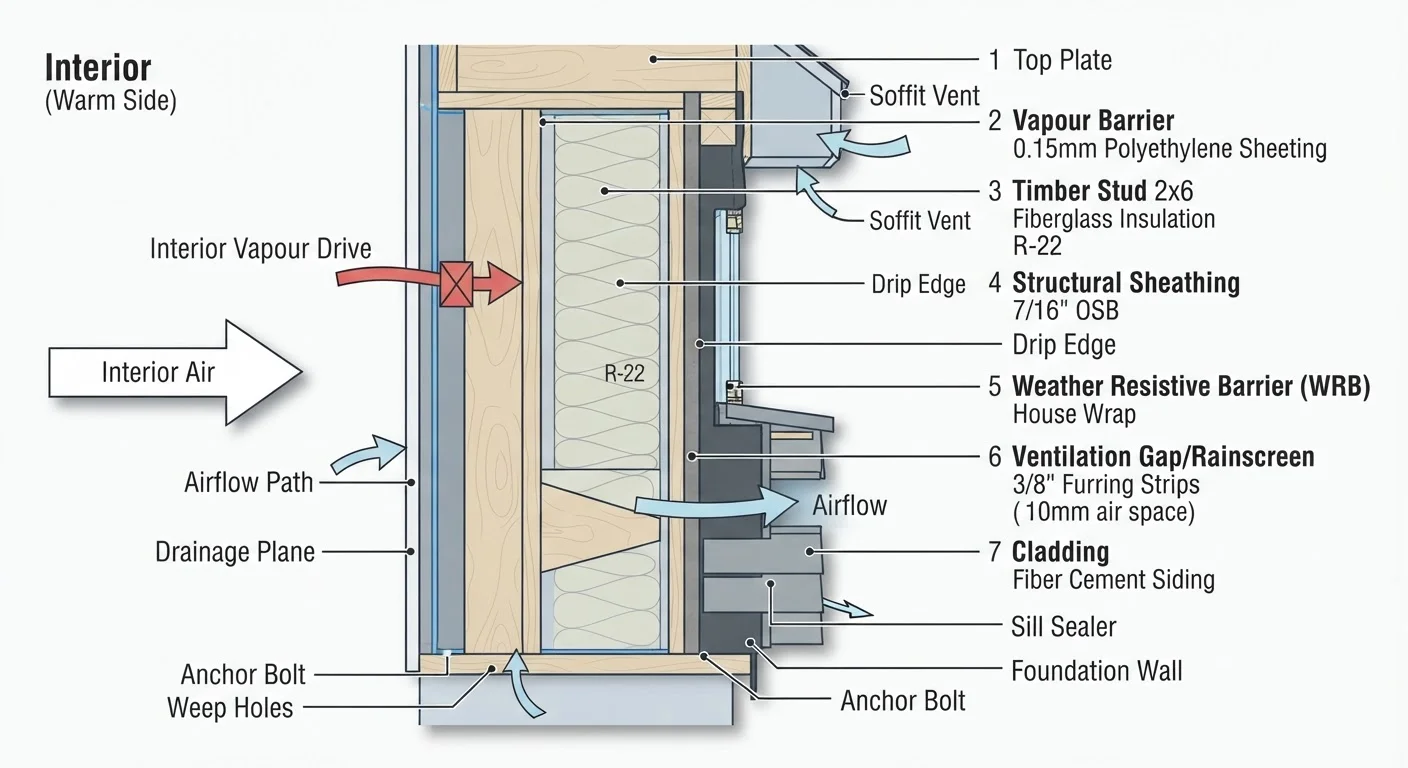
Understanding how moisture moves through a building is the first step toward stopping it. Water vapour migrates from areas of high concentration (warm, humid indoor air) toward areas of lower concentration (cold, dry outdoor air in winter). If it reaches a cold surface inside the wall — called the dew point — it condenses into liquid water. This is called interstitial condensation, and it's invisible from the surface yet highly damaging over time.
Three building systems, working together, interrupt this process: ventilation removes humid air before it can migrate into the structure; insulation keeps surfaces warm enough that condensation is less likely to form; and vapour control layers slow or stop vapour from entering the assembly in the first place.
Ventilation: The First Line of Defence
No home is perfectly sealed, and that's actually a feature, not a flaw — buildings need controlled airflow to dilute and expel moisture-laden air generated by cooking, bathing, breathing, and drying clothes. The goal is controlled ventilation, not random draughts.
Run bathroom and kitchen extractor fans during and for at least 15 minutes after use.
Moisture from cooking and bathing is generated in short, concentrated bursts. Running fans only during the activity leaves residual humidity in the air, which then migrates into walls and ceilings. The additional 15 minutes clears this residual moisture before it can accumulate.
Keep trickle vents open year-round unless there is a specific reason to close them.
Many homeowners close trickle vents in winter to reduce draughts, but this traps moisture-laden air indoors. The heat loss through an open trickle vent is modest compared to the damage caused by elevated indoor humidity over a heating season.
Inspect loft eaves annually to confirm insulation has not blocked ventilation paths.
Blanket or loose-fill insulation can shift over time and block the airflow channel at the eaves, turning a ventilated cold loft into a stagnant, moisture-prone space. This is one of the most common causes of mould on the underside of roof decking.
Install continuous insulation layers rather than filling only between studs or joists.
Insulating only between structural members leaves the members themselves as thermal bridges — cold pathways where condensation forms. Continuous insulation over the face of the structure eliminates this cold spot.
Tape all joints and penetrations in vapour control membranes with compatible tape.
Unsealed laps and holes around pipes or cables are the points where air — and the moisture vapour it carries — bypasses the vapour control layer. Continuous, taped membranes provide exponentially better protection than untaped ones.
Kitchens and bathrooms are the highest-priority rooms because they generate the most moisture. Extractor fans should vent directly to the outside — not into a roof space or ceiling cavity, which simply relocates the problem. In homes with trickle vents (small slots built into window frames), keeping them open year-round significantly reduces background humidity levels without meaningful heat loss.
Roof spaces also need ventilation. A cold loft (where insulation sits at ceiling level rather than at rafter level) should have airflow at eaves and ridge to prevent condensation on the underside of roof decking. Check that loft insulation hasn't been pushed into the eaves and blocked this airflow — a very common issue during DIY insulation work.
Check Fan Discharge Points from Outside
Walk around the exterior of your home and locate where bathroom and kitchen fans discharge. The vent should have a flap or louvre that opens when air is flowing and closes when the fan is off. A stuck-open or missing flap allows cold, moist outside air to enter the duct — and eventually your home — reversing the fan's purpose.
Insulation and Thermal Bridging
Insulation's role in damp control is often underappreciated. Well-installed insulation keeps interior wall surfaces warm, which raises the dew point threshold and reduces the chance that moisture condenses inside the assembly. Poorly installed insulation — with gaps, compressions, or missing sections — creates cold spots that attract condensation exactly where it's least visible.
Thermal bridging occurs where a highly conductive material (like a steel lintel, concrete column, or timber stud) bypasses the insulation layer. These spots can be significantly colder than surrounding surfaces and are common condensation sites. Addressing thermal bridges typically requires continuous insulation across the element — something worth planning for during renovation rather than retrofitting later.
For a detailed look at how different insulation materials perform and where each is appropriate, see our guide to insulation materials. And if you've come across conflicting advice about R-values or foil barriers, our insulation myths article separates fact from fiction.
Up to 30%
Heat lost through poorly insulated walls
The U.S. Department of Energy estimates that walls, floors, and ceilings account for a significant share of a home's total heat loss, with poorly insulated assemblies contributing disproportionately.
24–48 hours
Time for mould to begin growing on a wet surface
The EPA notes that mould can begin developing on wet building materials within one to two days under warm conditions, underlining how quickly moisture problems escalate.
Vapour Control: Slowing Moisture at the Source
A vapour control layer (VCL) — sometimes loosely called a vapour barrier — is a membrane installed on the warm side of insulation (typically the interior face) to slow the movement of water vapour into the wall or roof assembly. It doesn't need to be completely impermeable; most modern VCLs are vapour-retarders that allow some controlled diffusion rather than blocking all moisture movement, which can trap moisture if conditions change.
Correct placement is critical. In a cold climate, the VCL goes on the interior (warm) side of insulation. Installing it on the cold side — or omitting it entirely while adding insulation — can actually worsen condensation risk by creating a cold, airtight layer where moisture accumulates. This is a common mistake when homeowners add insulation without understanding the full assembly.
Vapour Control Rules Vary by Climate Zone
The correct position and type of vapour control layer depends on your local climate. In hot, humid climates, the moisture drive can reverse seasonally, making membrane placement more complex. Building codes in many regions specify vapour retarder requirements — always check local codes or consult a building professional before modifying an existing wall or roof assembly.
Joints, penetrations (pipes, cables, recessed lights), and edges of VCL membranes must be carefully taped or lapped to maintain continuity. A vapour control layer with unsealed gaps provides little meaningful protection because vapour will migrate through the path of least resistance.
Sealing air leaks is closely related to vapour control — stopping air movement also stops the vapour it carries. Our articles on caulking gaps effectively and choosing between caulk and weatherstripping cover practical sealing techniques in detail.
Quick Checks Any Homeowner Can Do
You don't need specialist equipment to spot early warning signs of moisture problems. Start with a visual inspection, particularly in autumn before cold weather arrives. Our seasonal inspection checklist is a useful companion resource for this process.
When in doubt — especially if you're considering adding insulation to an existing wall or roof assembly — consult a building surveyor or energy assessor before proceeding. Changing one part of a moisture system without accounting for the others is one of the most common ways well-intentioned home improvements accidentally create damp problems rather than solving them.